Hey guys,
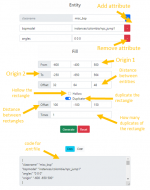
In this tutorial I'll show you how to use the Entity Generator I made.
This is not an editing tutorial! you can learn map editing in the Editing Tutorials sub-forum.
If you find any bugs you can reply here or send me a pm with the details.
Thank you @Janno for hosting everything on the forum's servers.
you can find the tools Here or head to https://maps.3d-sof2.com/ and on the left side-bar head to "Kawa's entity generator".
Lets get right into it.
Entity Setup
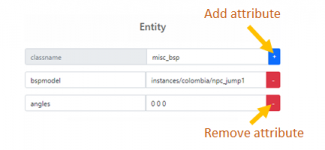
First, you will need to build the entity you want to generate.
Every entity has a classname, edit the classname's value, I will use
after that add all the attributes of the entity except for the
If you don't know what are the "key" and "value" arguments, go here for a basic tutorial explaining this,
in short these lines determines the entitiy's attributes.
you can add as many as you need or remove any you created with the red "-" button
to remove all attributes at once click the "Reset" red button.
Fill Setup
After setting up the entity itself, you want to get an area where the entities will be generated in.
to get this area you will need two points (origins), these points will represent the corners of a rectangle.
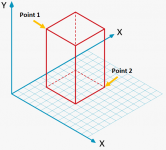
to get these points, you can go in-game and use the
if you wish to follow this example, I will use the model for the green box (npc_jump1) I used in the basic tutorial.
for the origins I use the following points in the map "inf.ent":
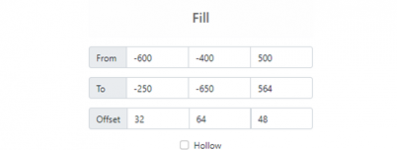
the offset I chose is the box size which is 32*64*48 so the boxes won't clip.
The "Hollow" checkbox is to determine if the insides should be hollowed or not, it is currently bugged however so I don't recommend using it, you can still do it if you get the perfect box size but not recommended atm so just uncheck it (This will be fixed evantually).
Now if you click Generate, you should see the code in textbox, you can copy to clipboard by clicking the "copy" button next to it.
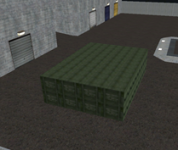
in-game you should see the generated boxes:
Duplicate
if you wish to duplicate the rectangle you made, you can do it with the "duplicate" switch, it is pretty straight forward:
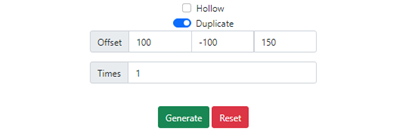
The offset is by how much to move the whole rectangle of entities.
Times means how many duplicates to create (1+).
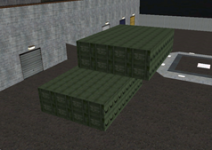
this will duplicate the rectangle and move it all in-game:
This is pretty much it at the moment, I am working on more features like loading a .ent file and editing it online but these things takes a while and I don't have a lot of time for this right now, I did rush this core functionality, so bugs are definitley possible, I am aware of the hollowing feature clipping, I will fix it when I have more time.
Upload your edits to https://maps.3d-sof2.com/ to enrich the 3D server's mapcycle and if its any good we will all see it in action.
In the meantime hope you find it useful, and happy editing!
All the best,
Ori (Kawa).
In this tutorial I'll show you how to use the Entity Generator I made.
This is not an editing tutorial! you can learn map editing in the Editing Tutorials sub-forum.
If you find any bugs you can reply here or send me a pm with the details.
Thank you @Janno for hosting everything on the forum's servers.
you can find the tools Here or head to https://maps.3d-sof2.com/ and on the left side-bar head to "Kawa's entity generator".
current beta version (v0.12b): https://orisne.github.io
Upcoming Features:
Known Bugs:
Upcoming Features:
- Upload an .ent file to website and check for validity (WIP, no estimated timestamp of yet)
- Rotate Entities with "angles" attribute (WIP)
Known Bugs:
- "Hollow" function doesn't work as intended (Fixed in beta version 0.12b, calculated new end-points)
- Tooltips are not showing properly, currently disabled (Fixed in beta version 0.12b, updated popper)
- Generate button sometimes doesn't work, or throws error (Fixed in beta 0.12b, updated core function)
Lets get right into it.
Entity Setup
First, you will need to build the entity you want to generate.
Every entity has a classname, edit the classname's value, I will use
func_static for this exampleafter that add all the attributes of the entity except for the
origin one using the + button next to the classname's input.If you don't know what are the "key" and "value" arguments, go here for a basic tutorial explaining this,
in short these lines determines the entitiy's attributes.
you can add as many as you need or remove any you created with the red "-" button
to remove all attributes at once click the "Reset" red button.

Fill Setup
After setting up the entity itself, you want to get an area where the entities will be generated in.
to get this area you will need two points (origins), these points will represent the corners of a rectangle.

to get these points, you can go in-game and use the
/viewpos command in the console (~).if you wish to follow this example, I will use the model for the green box (npc_jump1) I used in the basic tutorial.
for the origins I use the following points in the map "inf.ent":
"-600 -400 500" and "-250 -650 564"
the offset I chose is the box size which is 32*64*48 so the boxes won't clip.
The "Hollow" checkbox is to determine if the insides should be hollowed or not, it is currently bugged however so I don't recommend using it, you can still do it if you get the perfect box size but not recommended atm so just uncheck it (This will be fixed evantually).
Now if you click Generate, you should see the code in textbox, you can copy to clipboard by clicking the "copy" button next to it.
in-game you should see the generated boxes:

Duplicate
if you wish to duplicate the rectangle you made, you can do it with the "duplicate" switch, it is pretty straight forward:

The offset is by how much to move the whole rectangle of entities.
Times means how many duplicates to create (1+).
this will duplicate the rectangle and move it all in-game:

This is pretty much it at the moment, I am working on more features like loading a .ent file and editing it online but these things takes a while and I don't have a lot of time for this right now, I did rush this core functionality, so bugs are definitley possible, I am aware of the hollowing feature clipping, I will fix it when I have more time.
Upload your edits to https://maps.3d-sof2.com/ to enrich the 3D server's mapcycle and if its any good we will all see it in action.
In the meantime hope you find it useful, and happy editing!
All the best,
Ori (Kawa).
Last edited:

